Saturday, 16 July 2011

Aargh!


So this is the activator for my clear coat. Clearly I won't be finishing Ben's frame this weekend.

This puts me in a bit of a bind - I have a couple of litres of Imron clear, and about half a litre each of red, black, and white. They all use this activator. Unfortunately the mob I buy my paint from no longer stocks Imron, and I'd prefer to go with the DeBeer product that they're selling. That means effectively chucking over four litres of paint.

Oh well, I guess I had to make the change at some point.

Friday, 15 July 2011

It's upside down!


Ben's bike has paint on it - the colour scheme was his idea, to match a favourite jersey. I think it looks kinda cool - certainly very bold.

I've just put the decals on, and am leaving it overnight before putting the clear coats on. This is how the auto-air paint looks immediately after spraying - a nice satin sheen. It's terribly delicate at this point- hence hanging up.


The head tube took a fair bit of patience to mask - I found the trick was to use lots of very small bits of tape, and to press each one carefully into the shoreline with a biro before cutting it with a scalpel. I did the yellow panels first, then the red. On the seat tube there are little orange decals at the transition between yellow and red.

Friday, 1 July 2011

Et Voila!

So after a few nights through the week burning the midnight oil (or is that LPG?), I'm at the point where Ben's frame is ready for paint. This is where I think frames are at their most beautiful, before the paint (however thin) hides all that delicate detail. Anyway, here are a bunch of pictures.

Please do click on the pictures to see larger versions. Those that come up in the blog are rather small.

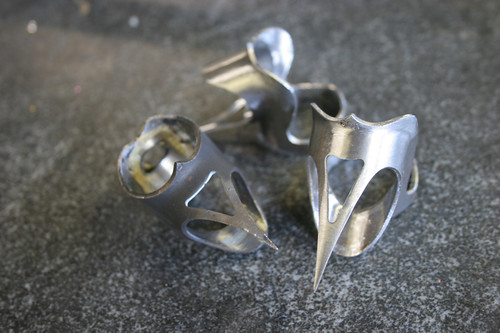
Starting with the head tube. I polished up the nice little Llewellyn ergo bosses. They're fitted with brass adjusters from Ceeway. As mentioned in previous posts, the head lugs are Llewellyn Cadenzia, with added cutouts.


More detail of the lower head lug cutouts, and showing the shorelines.


The top head lug has similar cutouts to the bottom. Also visible here is the rear brake line port. It's on the right side, because here down under, we usually run the rear brake on the left lever. By running the brake line around the right side of the head tube, It will then have a much neater bend. That's the theory, anyway!


Turning now to the seat lug, you can see the difference that taking material off the rear skirt section of the lug makes. I think it looks a lot cleaner and more minimalist that the original lug. The seat stays were brazed on with system 48, which builds lovely fillets at silver temps.


More detail of the seat lug. Here you can see the shaping I do to the back of the binder. I love the shape of the top of the Llewellyn seat lug - very organic.


A shot from the other side shows the rear brake cable port, which is in the conventional position. Also, the triangle cutouts. I really like like how these turned out, and will definitely do them again on subsequent frames.


The brake bridge. What can I say? It's the bit you bolt the rear brake to. These bits can actually be a little annoying to braze, as the goal of keeping the cutouts free of silver while putting a fillet on the bridge just a couple of millimetres away is rather contradictory. This is where teeny tips are used.


The dropouts. My fingers are sore.


Here's the bottom bracket area, showing also the chain stay bridge and front derailleur tab.


More detail of the bottom bracket, showing the neat shorelines that are possible with system 48. This stuff builds bigger fillets than 56%, but cleans up readily. The neat thing is that it fills gaps.


And finally the whole thing, to put everything in context. I think the XL tubes look good on this size frame - they make a frame that otherwise would look spindly look more normal. This is 57cm long and 58 tall. It's probably about the smallest frame I'd want to do with XL tubes.

For reference, the frame weighs 1950g. That's for Columbus Life tubes. Contrast that to the 1680g I got for Kristyn's compact frame, with cheaper Zona OS tubes. Yes, the frame is bigger, but I think the XL tubes do have a bit of a weight penalty.

Thursday, 23 June 2011

Lugwork - 3

One final lug to work - I'd cut triangles in the seatlug previously, but had to wait until I could see how the seat stays would attach before doing the back. I mitred one of the seat stays last night and simply traced around the end. At first I thought some triangle cutouts in the long tangs would look good, but decided they were too fussy, so simply cut the tangs down and reshaped the back a little.


Here's the result.

Wednesday, 22 June 2011

More progress on number five.


I'm making good progress on putting Ben's frame together. Here's a photo of the front triangle and chainstays in the jig. The XL tube sizes are a tight fit, but it all goes in okay. The top tube isn't brazed in yet - it's just jigged up so I can mitre the seat stays and work out what to do with the skirt section on the seat lug.


Here's a nice macro photo of the lower head lug. I used 56% silver filler with this, and dropped back to a number 12 tip, using the system 48 flux. I'm quite pleased with how it turned out - the amount of filler is good, and I got full penetration without much encouragement. Also shown is one of the ergo cable adjusters. These are quite a challenge to hold on the downtube. These were brazed in with 56% silver filler, using the stainless light flux.


Here's the progress on the bottom bracket. As you can see, I'm yet to mitre or braze in the chainstays. The BB-downtube join was done with system 48 filler, and system 48 flux. I went up to a number 20 tip for this one (I modified my largest acetylene tip for LPG by drilling a counterbore in the end). I really liked using this tip - it let me get very even heating.

The system 48 filler is a little gummier than 56%. I don't get the minimalist shoreline fillets I'm used to with 56%, so there's a little more shoreline cleanup needed. That said, it pulls through really well and fills bigger gaps than 56%. Just the ticket for bottom brackets. I can see myself using quite a lot of this filler.


Finally one of the dropouts. I've got a standard recipe now that works a treat for stainless. 56% filler with grey stainless light flux. I used a number 12 tip here, as the dropout tends to act as a bit of a heatsink. I overdid the filler a little, as evidenced by the excessive fillet in the cutout. Contrast that with the really nice fillet I got on the cutouts on the lower head lug.

Wednesday, 15 June 2011

Interior cable routing


Interior cable routing is quite a bit of work, but very rewarding when it works well. I use a two-step process, where I first solder the tunnel to the top tube, and then solder a reinforcement piece over the top. It makes for a lot of work, but I think the peace of mind knowing that the join is nice and solid inside is worth it.

I start by slotting the top tube - I just use a drill and file for this - I aim to get a really neat fit to the angled cable tunnel end. Then I assemble the cable tunnel by cutting the middle piece to length, and soldering the larger end pieces on with 56 % silver.


Next the cable tunnel is inserted into the tube. This can be tricky. Ben's frame has the entry point horizontal on the right side, to make for neat cable routing around the head tube, and then horizontal again on the left at the back. I'm leery of having the cable exit at the top, as that's asking for water to work it's way in.


Apply plenty of flux (I'm using the System 48 flux here, with 56 % silver filler).


And solder the tunnel to the tube, aiming for a small fillet all around.


After cleanup, it looks nice and clean, with a good fillet.


Next, I put the reinforcing diamond on top, ensuring it fits neatly. A little bit of blacksmithing was required to form the diamond so that it neatly fits the 31.75mm XL tube, as they're designed to go on 28.6mm tubes. I forgot to take a photo before fluxing, so the fluxed one will have to do.


And solder it in, again using 56% silver filler and System 48 flux. It's hard to do these neatly, as you have to ensure there's enough filler to fillet the tunnel end, and it tends to go everywhere. Also they're tiny pieces, and easy to overheat. I use a much smaller tip (no. 8) than my usual no. 15 for this work.


Finally, wash the flux off, cut the tunnel down neatly and use emery and needle files to remove the excess filler.

Tuesday, 31 May 2011

System 48


I wasn't 100 percent happy with the fit-up of the seat tube socket on the bottom bracket of Ben's bike. The casting was just a bit more sloppy than what I'm used to using with 56% silver.

The issue here is that 56% silver is not at all forgiving of gaps. It flows like water (which is a good thing, as I can get really good penetration when everything is just so), but has practically no ability to fill.

So I asked for advice on the framebuilder's list, and was pointed in the direction of System 48 filler and flux, by Wade Barocsi of Cycle Designs. This stuff is still a silver filler, but is formulated so it's got an ability to fill a little. Like 56%, it's revoltingly expensive. I do wish people wouldn't speculate on silver and push the prices up.

In use it's clearly more viscous than 56%. You've gotta give it encouragement to draw it through the lug. It does though, and the result is really strong, without having to go to higher temperature fillers like LFB. The cable guide on the other side is held on with 56%, and I didn't reflow this join.

The picture shows the result, immediately after soaking the flux off and prior to any clean-up, so it still looks ghastly. You can see it's penetrated 100%, and also that I was a little on the generous side.

Another thing you can see here are pins. I pinned this join, and soldered it out of the jig. I'm quite happy with the result - it's a hell of a lot easier to get access.

Monday, 16 May 2011

Lugwork - 2


I thought I'd show the process of putting a cutout in a lug.

The lug I'm working on here is the upper head lug for Ben's bike. It's a Llewellyn Cadenzia XLH lug, and I'm doing a little work to it to make it look more like a classic Bocama Professional.

I start by roughly marking where the cutout will be, using a sharpie. Then I put four center punch marks in; one in a little from each of the triangle vertexes, and a third right in the middle.

Next I use a pillar drill to drill a 1/8" hole where each vertex will be, and then a bigger hole in the middle, as shown below:


Next step is to open out the holes to form a rounded triangle. I predominantly use a 1/8" diameter Swiss No. 2 round file to move the vertex around, and a three square Swiss No. 2 file to bring the sides down towards the vertexes:


Once I'm reasonably happy with the shape, I swap to needle files. These are mainly used to reduce the diameter of the vertexes and smooth everything up:


These cutouts have a matching one on the other side, so I do them both at the same time, doing plenty of measuring to ensure they match. The final step with this lug is to round out the cheeks a little to soften the look. Here's how it ends up looking along with the lower head lug, which I did previously:

Tuesday, 10 May 2011

Lugwork


I confess this is probably my favorite part of framebuilding; where I get to play around with the lugs and make them look right.

I started by quickly filing and sanding the casting roughness from the derailleur tab and STI cable bosses. There wasn't any real modification done to these, save to file the loveheart cutout on the STI bosses into a rounded triangle, so that it matches the other lug cutouts I plan for the frame.

Next I removed the rack mounts from the dropouts, and cut some small triangles into them. As with the other stainless parts, much of the casting roughness has been files off and I've hit them with some emery. Once they're on the chainstays, I'll do some more serious sanding and polishing.

Finally I went to work on the lower head lug. I first cut a triangular cutout in the tang, and then removed the cast-in STI bosses. They looked a little full then, so I cut more triangles in where the STI bosses had been, and rounded the sides a little. I'm quite happy with the look now.

Next step is to replicate the cutouts and shaping on the upper head lug, and then decide what I want to do with the seat lug.

Saturday, 7 May 2011

Ingredients


Here's the ingredients that I'll use to make Ben's frame (from the top of the picture):

  • Head tube: Columbus 36mm.
  • Down tube: Columbus Life 34.9mm x 650mm
  • Top tube: Columbus Life 31.7mm x 600mm
  • Seat tube: Columbus Life 31.7mm x 635mm
  • Seat stays: Columbus Life 17mm, tapering to 12.5mm tips.
  • Chain stays: Columbus Life 30mm x 17mm oval, tapering to 12.5mm tips.
  • Brake bridge: Silva art 189 with art 362 reinforcement diamonds.
  • Dropouts: Llewellyn LRD72/SS stainless, 72 degree angle.
  • Front derailleur tab: Silva art S286 stainless.
  • BB cable guide: W2081 stainless.
  • Bottom bracket: Long Shen LB09-3
  • Lugs: Llewellyn Cadenzia XLH.
  • STI bosses: Llewellyn LL-09-35 with Ceeway brass deluxe STI adjuster screws.
  • Brake cable tunnel: Silva art 150 with art 141 reinforcement diamonds.
  • Rear derailleur cable boss: Silva art 152.
  • Bottle bosses: Silva art 471 with art 361 reinforcement diamonds.

Not shown, of course, are the 56% silver rod that I'll use to braze the frame together, nor the paint.

Next step is to do some lug prep - I'm going to cut the STI bosses off the lower head lug, and cut triangles in many of the lugs, to give them a classic Bocama look - something like this:


Then I'll file and sand the casting marks out of the dropouts, front derailleur tab, and STI cable bosses in preparation for polishing once they're brazed in place.

Only then will I start cutting and mitering tubes.