Monday, 10 October 2011

Seven and Eight

Numbers seven and eight have been started. They're a matching pair of track bikes - one for myself and one for Kristyn.


Here's mine - very standard geometry. It's about a cm smaller in many dimensions than my usual roadie. I've increased the head angle to 73.5 degrees, and increased the seat tube angle to 74 degrees. The goal is for a frame that's good for training on the track through winter, so not extremely twitchy - something to do longer events on.


I've already discussed the geometry of Kristyn's. We're using 650c wheels to get the bars down nicely - otherwise it's surprisingly conventional.

Both frames are to be built with Henry James oversize lugs, Keith Anderson dropouts, and mainly Columbus Spirit for lugs tubes. An exception is the chainstays - I'll use True Temper OX Platinum 28 x 20mm ones rather than the more usual 30 x 16mm ones. This should provide a bit more lateral stiffness.


Now to get ordering parts - I already have most of the lugs, but need to get a few from Henry James (a bottom bracket and seat lug), and need to buy the tubes as well.

And the nice bit. No stainless!

Our new place


So since we moved out of our awful little flat to a proper house (enabling more frame building with it's lovely large garage), I've settled into a bit of a morning routine. Perry and I get up around 6:30 (having been woken by the cat), I make coffee while he feeds the cat, then we pop some fresh food and water in the rabbit's bowl and put her outside for the day (she stays inside overnight to protect her from neighbourhood cats). Perry usually has brekky out, so I drop him off at the station, then come home and spend an hour or so working on bike stuff before getting ready for work myself.

This has come to be one of my favourite times of the day. The house is nice and quiet because Kristyn is yet to wake, so I sit at the computer, or clean lugs, or whatever, while our cat sits on whatever I'm doing.

Just now there was a bit of a racket outside. I looked up and saw one of our neighbourhood possums wandering along the fence. All is right with the world.

Monday, 3 October 2011

Number six ready for paint.


Keith's new frame is polished up and ready for paint-prep. It's built with Columbus Spirit for lugs tubes in OS size, with traditional level top tube. It measures 56.5cm long by 53cm high, to suit Keith's relatively short legs and long torso.

The frame is built for road racing, with 73 degree seat tube and 72.5 degree head tube. Lugs are Llewellyn's custodian, in stainless, with substantial modification and customisation.


Firstly some non-stainless content. Here's the only plain steel lug on the bike - the bottom bracket shell. It's an Everest part, which originally had a cast-in chainstay bridge. Given that Keith is a pretty powerful guy, I removed the standard bridge and put a much beefier one in, using a section of seat stay.


I wanted to put it as aft as possible for maximum rigidity, so I scooped out a section using a file to provide a bit more tyre clearance, and filled it in with a down-tube offcut, brazed in with brass so that it didn't fall to pieces when silver brazing the chainstay bridge to the frame. It should be really stiff.


The front derailleur tab is a Richard Sachs one, again in stainless. These things are just so cool it's incredible.


Here's that seat lug, polished to a mirror finish. I know I said previously that I wouldn't do another, but I'm already plotting my next one. Will I ever learn?


The hardest bit to polish was between and under the seat stays, as I couldn't get a polishing mop in there. I did this by hand, using strips of cloth and Brasso.


The head lugs look really classy, I think. I put Bocama-esque cutouts in all the lugs, to make them look a little less heavy. I took a huge amount of material out of the top head lug around the front to lighten it, and removed the ergo cable stops from the lower head lug. I used Llewellyn's downtube-mount cable stops instead, which both look much cooler and ensure there's no interference between front brake and gear cables.


Of course it's all polished to a mirror finish, to showcase my obsessive compulsive disorder.


The dropouts are Llewellyn stainless, to match the fork. Again, polished to a mirror finish.


This is actually the second brake bridge on this frame - I wasn't happy with my first go, so cut it off and tried a second one.


This frame has been quite a bit of work, but I think the results are really worth it.

Sunday, 25 September 2011

Just say no to polished seat lugs


This is my first, and probably last, polished stainless seatlug.

It's not that it was terribly technically challenging to do - the lug prep, mitering, and brazing were not so terribly different to what I normally do with a seatlug, except perhaps the degree of care in mitering the seat stays just so, and minimising the fillet when brazing them into place.


No, the real difficulty is the incredible amount of time it takes to file, sand, and finally polish this lug. Then, just when you think it's pretty good, you braze the seat stays in place and have to go back to 240 grit. Not to mention that it's practically impossible to get anything in between the stays - I'm seriously considering attaching emery to large matchsticks to get in there.

This one (Keith's) is probably at 80%. I've got more work to do under and between the seat stays. I'm very happy with the way the stay attachment has worked out - I think that should relatively easy to mask.

If only it didn't look so good!


I'll do a dozen crowns and headlugs before another seat lug. They're just easy to do - straightforward convex surfaces with plenty of room to swing a file.

Tuesday, 20 September 2011

Seat stays


It's always fun when those last two tubes get mitered up, ready to go on. The frame goes from a collection of tubes to an identifiable frame.

So this is the setup I've decided to use for the seatstay mitering. They join just a tad more aft than what I usually do - this will make the gap between them a tad (that's an important technical term - a little more than a squidge, but less than a mite) less than usual.


The plan is to make a silver preform and put this inside the tube, then heat and flow it out. This way I end up with minimal fillet on the outside (so I can polish the lug and have a maskable line), and a decent fillet on the inside, for a nice strong join.


I used just two tools to construct these fillets - a hacksaw and my 300mm half round second cut file.

Oh, and yes, that is a hair elastic holding the seat stays in position.

Wednesday, 14 September 2011

My other bike


Apologies to Keith, but this weekend is the annual Ducati owner's club concourse. This year the competition for the 2V monster trophy promises to be pretty fierce.

So I've spent the last week or so prepping my little duc 695, rather than working on Keith's frame.


It's been modified a bit since I bought it, but rather than just adding piles of carbon bling, I've kept the modifications purely functional. The biggest change I made was fitting superbike forks and brakes. The forks came off a 998, and necessitated fitting clipon handlebars and a fair bit of machining work to fit. After I'd swapped the springs for the correct ones to suit me and my monster, the ride is fantastic. I also swapped my brake calipers, master, and rotors for larger 320mm ones with four pistons per caliper. It handles like a dream.

The prep here involved painting the (originally chrome) headlight surround satin black, and removing the original handlebar mounts from the top triple clamp, then painting it satin black as well. Not to mention many hours of patient cleaning and polishing.


Most people simply buy a replacement triple when they do the fork upgrade. I prefer to work with what I have. I'm really happy with the way the original triple has come up. The front looks really cool and purposeful now, with the damping and preload adjusters for the forks poking through. The bar position with the clipons is much better than the original bars, which were rather too high for my tastes.

I kinda like this photo. It's gratifying to see the reflection of my neighbour's house in my tank :)


The 695 is notorious for running very lean from the factory - this ensures it passes strict European emissions tests (a good thing), but does mean the cylinders run rather hot. The paint on my cylinders and heads had gone gooey, and on the front head the gooey paint had picked up lots of road grime, looking really awful.

The exhaust header also went very rusty.

I've removed much of the gooey filthy paint from the front head. At some point I'll have to pull the heads and cylinders off the motor and bead blast the remaining paint, then respray them. This will do for now though.

I thought my headers would have to be replaced, but much elbow grease with scotchbrite pads and WD40 had them looking like new again.

Monday, 29 August 2011

More progress on Keith's frame


I've made good progress on Keith's roadie. Having mitred all the main tubes, I added bidon cage mounts, front derailleur tab and rear brake cable tunnel. Then I brazed both seat tube and down tube into the bottom bracket, and the lower head lug. I used System 48 for the BB, and 56% silver for the stainless head lug.

Here's the whole thing on the jig:


The BB after brazing. This is the first time I've brazed both down and seat tubes in the one go - it prevents reflow of the seat tube join when I add the down tube later, as I'd done previously. In any case, I'm really happy with the result - I got the filler to flow really evenly without much encouragement.


Here's the lower head lug, immediately after brazing while it still looks awful. The filler just shot straight through this lug. This is my first stainless head lug, and I'm really happy with it.


Same join, after some cleanup with emery and green scotchbrite pad. Next step is to give the lug a nice polish.


After a quick polish (hah!) it looks pretty good:


Sunday, 28 August 2011

Keith Anderson dropouts


I just bought a set of these cool dropouts from Keith Anderson.

When I made my very first frame, I brazed thin stainless plate to plain steel dropouts so that the axle nuts wouldn't chew up the paint. It was successful, but I always wished there was something to let me put stainless in the slot, as well, so the axle itself didn't chew on paint.

These cool dropouts are exactly what I wanted then - nice beefy 4130 plates for strength, with cool milled faces in stainless. I've bought two sets of track dropouts, so will shortly make a pair of track frames (one for me, one for Kristyn).

The plan is to do a little carving - I might put my initials in under the seat stay...

Anyway, the dropouts are very, very cool - beautifully machined.

Monday, 22 August 2011

Fear me!


For I have a bottom bracket tap, made by Cobra, and courtesy of Peter at Ceeway.

It joins my lovely headtube reamer (also by Cobra) as one of my finest tools.

Now I don't feel quite so bad at parting with Ben's frame, as the proceeds bought me this :)

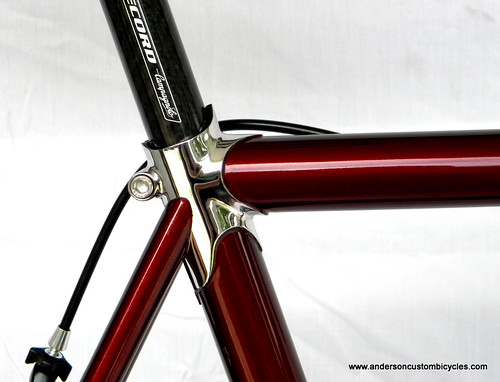
On a completely unrelated note, I think I have my answer as to how to do the seat stays on Keith's bike, and still polish the seat lug:

Graeme found a pic stream from Anderson custom bikes, showing what he did in a similar circumstance:


I think it looks incredibly cool, so shall shamelessly copy.

My first fork


I've never built a fork before. I've built five frames, but never a fork. The reasoning was quite simple. A steel fork weighs around 600-750g, depending on steerer length. A full-carbon fork weighs 350-400g (ones with steel steerers are generally just as heavy as steel forks, as all the weight is in the steerer). Carbon forks are cheap and plentiful, and work quite well.

Keith's bike, though, just won't work with a carbon fork. With polished lugs, sticking a bit of black plastic on would just ruin the aesthetics. So I decided to take the plunge and build a fork. Given that it's my first, I stuck to the basics - a 1" EL steerer, raked stainless crown, Nivacrom blades, and Dazza's gorgeous dropouts.

First step (documented previously) was to braze the steerer to the crown with 56% silver filler and stainless light flux. I then turned the crown race seat and gave the crown a polish.

Next I cut the small end of the blades down until they fit neatly in the sockets of the dropouts, cut the other end to length, and assembled the fork in a jig. I then brazed the dropouts to the blades, again with 56% silver filler and stainless light flux.


Once the dropouts had a handle, I took the opportunity to file, sand, and polish them.


I then set the crown sockets so the blades fit neatly, jigged the fork up, and brazed the blades into the crown. Having the jig upside down was very helpful here, as it encouraged the silver to flow right into the join. Again, 56% silver filler and stainless light flux.


I wasn't happy with the thickness of the crown where it joins the blades, so I took to it with a file and thinned it out a little, then sanded and polished it.


Here's the final result. For a first go I think it turned out pretty well.