Tuesday, 31 May 2011

System 48


I wasn't 100 percent happy with the fit-up of the seat tube socket on the bottom bracket of Ben's bike. The casting was just a bit more sloppy than what I'm used to using with 56% silver.

The issue here is that 56% silver is not at all forgiving of gaps. It flows like water (which is a good thing, as I can get really good penetration when everything is just so), but has practically no ability to fill.

So I asked for advice on the framebuilder's list, and was pointed in the direction of System 48 filler and flux, by Wade Barocsi of Cycle Designs. This stuff is still a silver filler, but is formulated so it's got an ability to fill a little. Like 56%, it's revoltingly expensive. I do wish people wouldn't speculate on silver and push the prices up.

In use it's clearly more viscous than 56%. You've gotta give it encouragement to draw it through the lug. It does though, and the result is really strong, without having to go to higher temperature fillers like LFB. The cable guide on the other side is held on with 56%, and I didn't reflow this join.

The picture shows the result, immediately after soaking the flux off and prior to any clean-up, so it still looks ghastly. You can see it's penetrated 100%, and also that I was a little on the generous side.

Another thing you can see here are pins. I pinned this join, and soldered it out of the jig. I'm quite happy with the result - it's a hell of a lot easier to get access.

Monday, 16 May 2011

Lugwork - 2


I thought I'd show the process of putting a cutout in a lug.

The lug I'm working on here is the upper head lug for Ben's bike. It's a Llewellyn Cadenzia XLH lug, and I'm doing a little work to it to make it look more like a classic Bocama Professional.

I start by roughly marking where the cutout will be, using a sharpie. Then I put four center punch marks in; one in a little from each of the triangle vertexes, and a third right in the middle.

Next I use a pillar drill to drill a 1/8" hole where each vertex will be, and then a bigger hole in the middle, as shown below:


Next step is to open out the holes to form a rounded triangle. I predominantly use a 1/8" diameter Swiss No. 2 round file to move the vertex around, and a three square Swiss No. 2 file to bring the sides down towards the vertexes:


Once I'm reasonably happy with the shape, I swap to needle files. These are mainly used to reduce the diameter of the vertexes and smooth everything up:


These cutouts have a matching one on the other side, so I do them both at the same time, doing plenty of measuring to ensure they match. The final step with this lug is to round out the cheeks a little to soften the look. Here's how it ends up looking along with the lower head lug, which I did previously:

Tuesday, 10 May 2011

Lugwork


I confess this is probably my favorite part of framebuilding; where I get to play around with the lugs and make them look right.

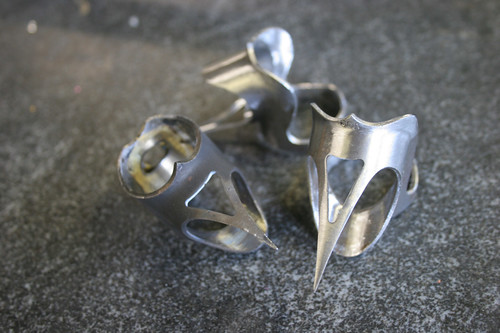
I started by quickly filing and sanding the casting roughness from the derailleur tab and STI cable bosses. There wasn't any real modification done to these, save to file the loveheart cutout on the STI bosses into a rounded triangle, so that it matches the other lug cutouts I plan for the frame.

Next I removed the rack mounts from the dropouts, and cut some small triangles into them. As with the other stainless parts, much of the casting roughness has been files off and I've hit them with some emery. Once they're on the chainstays, I'll do some more serious sanding and polishing.

Finally I went to work on the lower head lug. I first cut a triangular cutout in the tang, and then removed the cast-in STI bosses. They looked a little full then, so I cut more triangles in where the STI bosses had been, and rounded the sides a little. I'm quite happy with the look now.

Next step is to replicate the cutouts and shaping on the upper head lug, and then decide what I want to do with the seat lug.

Saturday, 7 May 2011

Ingredients


Here's the ingredients that I'll use to make Ben's frame (from the top of the picture):

  • Head tube: Columbus 36mm.
  • Down tube: Columbus Life 34.9mm x 650mm
  • Top tube: Columbus Life 31.7mm x 600mm
  • Seat tube: Columbus Life 31.7mm x 635mm
  • Seat stays: Columbus Life 17mm, tapering to 12.5mm tips.
  • Chain stays: Columbus Life 30mm x 17mm oval, tapering to 12.5mm tips.
  • Brake bridge: Silva art 189 with art 362 reinforcement diamonds.
  • Dropouts: Llewellyn LRD72/SS stainless, 72 degree angle.
  • Front derailleur tab: Silva art S286 stainless.
  • BB cable guide: W2081 stainless.
  • Bottom bracket: Long Shen LB09-3
  • Lugs: Llewellyn Cadenzia XLH.
  • STI bosses: Llewellyn LL-09-35 with Ceeway brass deluxe STI adjuster screws.
  • Brake cable tunnel: Silva art 150 with art 141 reinforcement diamonds.
  • Rear derailleur cable boss: Silva art 152.
  • Bottle bosses: Silva art 471 with art 361 reinforcement diamonds.

Not shown, of course, are the 56% silver rod that I'll use to braze the frame together, nor the paint.

Next step is to do some lug prep - I'm going to cut the STI bosses off the lower head lug, and cut triangles in many of the lugs, to give them a classic Bocama look - something like this:


Then I'll file and sand the casting marks out of the dropouts, front derailleur tab, and STI cable bosses in preparation for polishing once they're brazed in place.

Only then will I start cutting and mitering tubes.

Friday, 29 April 2011

Decals continued


My first lot of decals have arrived, from Cyclomondo.

I'm quite happy with them - the Gerber printer does quite a nice job. They aren't strictly speaking decals, but instead are printed vinyl stickers, similar to the Columbus etc ones. They're certainly thin enough to be hidden under clear coat.

The hardest part was finding a file format that Greg could read reliably - the software I used to create the artwork (Inkscape) doesn't output the right files for the Gerber printer, so lots of experimentation was required. I ended up sending Greg .eps and .plt (hpgl) files, one of which he was able to work with.

Greg removed some of the black outlining from the head badge - presumably to ensure that it printed well, as the outlining was pretty thin. I put it back with some fine 0.03mm Copic markers :) I confess I quite like hand drawing parts of my decals - fits in with the whole Richard Sachs "imperfection is perfection" thing, and allows me to release my inner artiste.

I think I'll scale up the downtube decals a bit for the next go, as these ones look a little small even on Kristyn's titchy frame.

Number Five


So construction has started on number five. This is a road racing frame for a friend, Ben. It'll be a 57cm square design, with short 41cm chain stays and a 73 degree seat tube angle. The 72.5 degree head tube and 45mm fork rake will make for a reasonably fast handling bike without being a handful - just the thing for road racing.

Ben wants a nice, stiff bike, so we decided to build with XL tubes - that means a 31.7mm seat tube and top tube, with a 35mm downtube and 36mm head tube. It'll be compatible with 1 1/8" steerers, so getting a fork that fits should be a doddle. I confess I have my doubts about the aesthetics of XL tubes. I prefer the slightly more traditional look of OS tubes myself (28.6mm seat and top, 31.7mm head and down). That said, in a 57cm bike, the XL tubes probably won't look too out of proportion.

Tubeset is Columbus Life, courtesy of Peter at Ceeway. The butt lengths work out quite well for lugs, on account of the frame being a little larger than average. I'm building with Llewellyn Cadenzia XLH lugs, which have a nice classic Bocama style shape. I'll probably do a little lug carving on this one, to make them look just a little skimpier.


Ben uses Shimano parts, so I'll cut the STI bosses off the lower head lug and attach some Llewellyn ones to the downtube.

I really loved using the Llewellyn stainless dropouts last time, so will use the same ones (in a 72 degree angle) for this frame.

I bought some Sachs front derailleur bosses as well, but it looks like (unlike the Silva parts I've used previously, which are amenable to bending to fit different diameter tubes) the Sachs bosses are for 28.6mm downtubes only. A pity, as these are about the sexiest little pieces of metal I've ever laid eyes on.


So far I have all the tubes, the BB (Long Shen), and the miscellaneous bridges and bosses, from Ceeway. I expect the Lugs from Llewellyn any moment, and will start cutting once they arrive.

Tuesday, 12 April 2011

Silliness


I'm thinking of doing a bike with fancy lugs - not just the odd heart cutout, but material added to lugs and serious work. The Pacenti style just doesn't do it for me, but the original Malvern Star style most certainly does.

So I'm thinking of making a little fish five star. That resulted in spending the last few evenings slaving over inkscape, creating the perfect Little fish decal in the wonderful Malvern Star style.

Oh, for reference, this is what a real Malvern Star decal looks like. If you've ever seen one in the flesh, you'll appreciate what works of art they are:

Friday, 8 April 2011

Decals

Can I just say how much of a pain it is getting decals sorted?

I used to make my own - there's a page at littlefishbicycles describing my rather arduous process, involving decal paper for inkjets, decal lacquer, and screenprinting. While I was successful at making a few sets, there was a lot of wastage involved and huge amounts of time.

So for my newer frames, I decided to pony up the dough and get them printed by some of the guys who do this for a living. Kristyn and I set to and designed a really cool decal sheet, shown below:


It takes full advantage of commercial printer's ability to print "4 colour", so we could do nice fades. Rather than just printing "little fish" in comic sans on the downtube, we instead designed a nice graphic version, with block letters, and with a cool shapely S to set it off. Anyway, I reckon it'll look good on a bike.

Only problem is, I sent the files to a couple of decal printers, and they're not interested. They just have too much work on, and they see my little job (rightly) as too fiddly.

So plan b is to go back to spot colour (no fades) and send the artwork to a guy who sells reproductions of classic bike decals on ebay. I redesigned the artwork to suit this process, as shown:


The printer that these decals are targeting is a Gerber edge FX, which at least doesn't involve making screens.

Fingers crossed - hopefully soon I'll have a pile of nice shiny decals to finish my frames off with.

Thursday, 7 April 2011

Framebuilding without a jig

I built my first three frames without the benefit of a jig. It was significantly harder than using a jig, but was still doable.

The secret to jigless framebuilding is to think of supporting each join in position, rather than of supporting the whole frame. Use the lugs to locate the two tubes against one another, and use a simple flat surface (my flat surface was some 40mm square section aluminium tube) to hold things in plane.

My 'jig' was my 40mm square section aluminium extrusion, a handful of pieces of sheet metal of various thicknesses to space things, a long 10mm bolt, and a couple of F-clamps.

Here's the general setup for the first join:


The aluminium section is simply used to hold the head and seat tubes at the necessary angle.

The second join:


Here a spacer is needed, to account for the width of the side of the BB shell. The hole in the extrusion is used to blot the extrusion to the BB face. A large washer is used on the other side.

The third join:


Here the seat tube is joined to the bottom bracket. The extrusion is used to hold the seat tube accurately in plane with the head tube - a thin spacer is needed to account for the difference in tube diameters.

Joins 4 and five:


Here the top tube is added. I keep the extrusion in place to ensure the seat and head tubes stay in plane.

Joins 6 and 7:


This one is hard - you've got to ensure both chainstays are in the right place - I found it easiest to add one stay, then use a known true wheel to locate the second one.

After that, the seat stays are added, and you have a bike.

Tuesday, 5 April 2011

Auto Air paint


I painted Kristyn's frame pearl purple. Previous frames have been either solid white or solid red, and painted entirely with Imron two-part paints. As the local place where I buy paint from no longer stocks Imron, I went on a search for something new.

That search led to Auto-Air, which is made for custom car and motorcycle painting. It's about as different a paint as you can get from Imron. It's water based, which is weird, but makes cleanup so much easier.


One of the really neat things about the Auto Air paint is that it's readily available in teeny little 120ml pots. I only used around 60ml to paint kristyn's bike, so a single little pot is all I need. Plus, it comes in a huge array of colours.

The process I followed with Kristyn's bike was to first prime with epoxy primer as usual, then lay a thin coat of white Imron down. I could have used the auto-air white sealer, but I have half a litre of white Imron to hand.

After giving the white base coat a day or so to set up, I then mixed my pearl purple with medium reducer 3:1 (to suit my 0.5mm nozzle airbrush), and sprayed a really thin misting coat. I gave it ten minutes to set up, and sprayed a second, slightly heavier coat. I repeated the process half a dozen times - very thin coats building colour slowly.

The auto-air paint lets you know quite definitely if you're putting it on too thick, by taking on a mottled appearance. It's actually pretty easy to work with, and suits my methodical methods much better than Imron, which always leaves me feeling rushed.

So after leaving the frame to set for another day, I then clear coated it, first with a misting coat, then after twenty minutes putting on a full gloss coat.

The final product looks pretty good. It's still got another couple of coats of clear to go, once I get decals sorted, but in the meantime Kristyn is happily riding it and showing it off to everyone.